Showing posts with label trends. Show all posts

Thursday, June 20, 2013

DIY No Sew Mexi-fabric Pocket Tank


 Lately I have been all about the "Accent Pocket."  From the runways to the streets of the hood (outside my window -_-) everyone is hot on the AP trend. 

Here's an easy NO SEW tutorial to give your summer clothes new life and some extra kick.  


Step 1: 
I started with and old white cotton t-shirt that I had ombré dyed with Tulip's One-step tie dye.  You can see my ombré dying video here to learn how I achieved the look. 

Then, I cut the t-shirt into a tanktop.  


Step 2: 

Next measure out a 5"x5" square onto some card stock paper.. I would explain more but um... just look at the pic yo! lol


Trace the pattern onto the fabric with some fabric chalk then cut it out with about a 1" seam allowance.  


To give the pocket a little more weight, I cut a strip of fabric. About 2 1/2" in height and 7" in across.


Step 3: 

Use Aleene's peel & stick Fabric Fusion tape to seal the seams of your pocket by folding excess fabric in on itself.  

Create seams for the fabric strip and use the fabric fusion tape to adhere strip to the top-front of your pocket  


Back of finished pocket


Front of finished pocket


Step 4:

Trace pattern with chalk onto tank to get a general idea of where you want your pocket placed.


Add Fabric Fusion to back of your pocket.  Be sure to only add the tape to the sides and bottom of the pocket, otherwise the pocket will be sealed and...uh...won't be a pocket...
so yeah...


Now you're gonna place the pocket onto the tank.  The tape is like, SUPER permanent so you are gonna have one shot to get the pocket in the right place so..uuh..GOOD LUCK brah!
Press down firmly to make sure that your pocket is completely adhered to the tank.


Step 5:


Finally I added this Crafty Chica iron on applique to the pocket using a high heat iron, on the "wool" setting.  Then just follow instructions on the packaging.    


...BOOM...
That's it! Pocket finished!
I even made a few different pockets with different design patterns!


Enjoy making your own rad, no-sew pockets ya'll!


Sunday, October 7, 2012

DIY Ombré Painted Jeans


When I had the chance to head up north and visit iLovetoCreate's HQ in Northern Cali with Maya in the Moment, I knew I'd have markers and paint and glitter and beads and tie dye at my fingertips.

You know I had to do a lil somethin' somethin'. 

I had pair of these white jeans I bought from H&M that looked so plain and sad and whatnot. I had to give it some life with a little ombré.
Check out my ombré tutorial:Make sure you follow @Boifromipanema and @iLovetoCreate on Twitter Instagram and Tumblr!

Monday, October 1, 2012

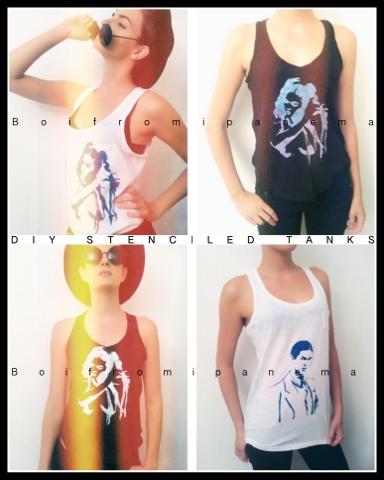
DIY Stenciled Frida Kahlo Tank


So lately, I have been on a big tank top kick.
 Being that I live in "sunny SoCal" the temperature is still in the 80's and 90's well into the beginning of October. 
Meaning??
Summer is still in full throttle mode.  

...le sigh....when will it be scarf, boot, hot cider weather yo?!!

I figured that the opportunity was still ripe and ready for just one more Summa-time Shenanigan post. Just to really seal up the deal. Although you can use this method on any fabric surface of your choice,  I decided to create a stencil of the beloved Frida Kahlo on a tank using DecoArt's SoSoft acrylic fabric paint.


Um, bewbs.
Frida was so butch.

Step 1: I started by printing out a few images of La Friducha that I liked from the interwebz. I was partial to these two, for obvious reasons. I found a really cool tutorial by Kathy, The Crafty Chica on how to cut graffiti-styled stencils which you can peep below.


Step 2: Make the stencil. I didn't have that cool little knife that Kathy had in her video, so I used a #11 X-acto blade. Try not to cut, stab, or dismember yourself like I always seem to do.

My stencil in progress.

All cut out and ready for some paint.

Kathy used spray paint, but I decided to apply the SoSoft fabric paint with stippling brushes.

Making sure the paint goes on nice and smooth.
SoSoft fabric Paints by DecoArt.

I can't rave enough about DecoArt's SoSoft fabric paint. The stuff is hashtag totes amaze. Since it comes in so many colors as well as glitter colors, I decided to make a few tanks for the ladies. Yeh, that's right, I said it...for the ladies. ;)


Step 3: Final step...bask in your the glory of your handiwork. My tanks came out bad ass, just like Frida herself.


Even the stencils turned out pretty dope at the end. I think I may frame these bad boys.
And there you have it, your own stenciled Frida Kahlo tank. Go forth and embrace your inner bad ass.


Monday, August 27, 2012

DIY Graphic Tee with SoSoft Fabric Acrylics from DecoArt


Have you ever been out shopping, when you see an article of clothing that makes you say, "I could totally do that myself"?

Well, that's me....most of the time.

One thing I've seen everywhere are hand-painted graphic shirts. The simple designs and sleek lines really make for an interesting piece.
So instead of just thinking hey I can do that--I actually decided to do it!
___________________

Let me show you how you can create your own cool, modern graphic tee so you can rock it out for the last days of summer and into the fall!


Step 1: Stretch the shirt over the cardboard so that you have a smooth, taut surface to work with. 100% cotton is always the best choice. And remember, if you choose a dark colored tee, the colors you choose may not show up as brightly as you'd like. I decided to stick with white.

That black stuff was a previous design I did with black that stuck to the cardboard backing.
Step 2: Choose a quality fabric paint in varying colors.  I have a set of RAD fabric paints from the cool people at DecoArt. Their SoSoft Fabric Acrylics paint line is the bomb dizzle. A lot of paints claim to be made for fabric, but end up feeling hard and thick once they dry. Nobody wants crunchy paint on their clothes. The SoSoft paints really do feel so...soft.....yeah. Just like the name implies.

look at all the pretty colorssssssssss
I even got a few bottle of the fine glitter finish.
Step 3: This next step is when you can really flex your creative muscle. Choose your color palette. You can then paint a design you may already have, you can incorporate a stencil, you can use a brush to give it a painterly effect or you can use your fingers. I decided to use a silkscreen technique of "squeegeeing" the paint onto the tee.

I choose these four colors.
I placed four very generous blobs of the fabric paint on my tee. It's okay if they touch. You decide where you want them on  your tee. I chose right under my v-neck tee so it could be positioned on my chest.
Here is where the squeegee comes in. I used a thick piece of watercolor paper folded in half as my squeegee, but you could also use a plastic one from a hardware store. Press down on the paint and with a fluid motion, spread the paint in the direction of your choosing, once, using even pressure.
I like how the paint faded toward the bottom of the design. And the tee is super soft and so is the painted design. Simple and modern and most of all, SUPER COMFORTABLE!!!


I really dig the abstract vibe of the design. I'll definitely be making more of these! 

Friday, July 20, 2012

DIY Studded Men's Gladiator Sandals

It's time for another installment of Summa-time Shenanigans, yo.

Anyone who knows me knows that I have an unhealthy obsession  extreme love for boots. Military boots, riding boots...pretty much any boot possible. I legitimately own enough boots to wear a different pair every day of the week.


However, it's summer and conventional wisdom says it's far too hot to wear boots.

Can you imagine trekking through the sand with your cooler, towels, surfboard, girlfriends beach bag (A.K.A triple sized purse) and a shopping bag full of Capri Suns and Salsa Verde Doritos while trying to INSTAGRAM [@boifromipanema] and live tweet your beach trip on TWITTER [@boifromipanema] ...IN COMBAT BOOTS? Not so fun, or practical for that matter.

You see what I did there?

So my obsession for the last two summers has been the studded Givenchy Gladiator Sandals for men by Riccardo Tisci. They are really comfortable and safer than flip flops and they look soo cool. D&G also came out with a line of sandals, some styles even come in mid-calf straps!

CRAY CRAY.
Now if you are like me and you can't afford to drop a minor fortune to invest in the Maison de Givenchy, ALDO sells some great sandals for men that are relatively inexpensive and with a little TLC and elbow grease, you can achieve a similar effect to the $600.00 counterparts.

I started off with these men's gladiator sandals from Aldo.

I then purchased a pack of 100 pyramid studs off Ebay for $3.00 (there are tons of sellers offering metal studs on Ebay).

With a bit of planning, I mapped out where I wanted the studs to go. Then, using a rubber hammer, I pounded the studs through and bent the sharp prongs back with a screw driver.


Once all of the prongs were flush with the leather, I polished up the studs and I was done. Super simple and the effect turned out pretty dope. DIY studded gladiator sandals and all for under $100!

Monday, July 2, 2012

DIY Wave-Inspired Tie Dye Tank


While surfing last week, I was knocked off my board by a huge wave and while under water I opened my eyes in time to see the beautifully rad swirls of sand and color being stirred up by the force of the crashing water. I was inspired to create a cool tank that is as bold and flowing as the waves themselves as part of my Summa-time Shenanigans series. I can help you create your own Wave-Inspired Tie Dye Tank in five easy steps!  

What you'll need:


I used Tulip's One Step Dye from iLovetoCreate in black and teal. The dye comes included with rubber bands and with a pair of gloves which, trust me, you are going to need. Seriously... unless you like zombie-looking fingers, then by all means omit the gloves...I guess.


Do yourself a favor and choose a white t-shirt that is 100% cotton. Anything less will produce less than stellar results and  you want stellar results, right?  I grabbed a tee in a few sizes larger than I normally wear to give it that easy, bohemian look. Then I used an old tank I had as a template. Oh, be sure to cover your work surface with a plastic cover as the dye is...well, dye and dye may dye your surface.  

So yeh....


Step One:

Turn your white tee inside out so you don't see your tracing marks after you draw your template with the marker.


Cut with a pair of sharp scissors. Make sure your lines aren't jacked up.

Step Two:

Using your spray bottle generously spray your tank until the fabric is thoroughly soaked all the way trough. Then pinch the fabric in the middle of the tank and twist until the tank has spiraled into a small tight bundle thinggy, as shown in the pic below. Aren't I so very descriptive!?

Bravo private school education... bravo  -_-

For sharper lines and more crisp color separation, you can secure your bundle "thinggy" with the rubber bands but this part is completely optional.


Step Three:

Next, add water to your Tulip dye bottles (which conveniently come with the dye powder already pre-measured inside the bottle) and shake until the powered dye is completely mixed, then simply add the colors to the fabric in an alternating spiral pattern. Go crazy. Alternate your colors, have fun--it doesn't have to be perfect. 


Step Four:

 Once you've thoroughly added the colors to the tank in the desired places, wrap it in plastic like a ninja and let the tank sit and absorb the dyes for at least 6 hours or overnight. This ensures that your fabric will retain as much dye as possible.


Step Five: 

When the resting time has finished, follow washing instructions as directed on Tulip dye box, dry and...VOILA!! 


Related Posts Plugin for WordPress, Blogger...